- Published on
How to design a Rate Limiter
- Authors

- Name
- Dinh Nguyen Truong
Have you ever kept hitting F5 on a website and suddenly got a message like “Too many requests, please try again later”? Or maybe when you were frantically hunting for deals on black friday sale, the site suddenly “lagged” and showed a notice asking you to wait in line?
That’s the rate limiter at work – a critical component in modern systems. Today, let’s explore it together.
Why do we need a rate limiter?
Protect the system from overload: When too many requests hit the server at once, the system can become overloaded and crash. A rate limiter helps control the flow of requests, ensuring the server only handles what it’s capable of, so that every user has a fair experience. It also helps reduce the risk of DDoS attacks.
Control infrastructure costs, especially for cloud-based systems. A rate limiter keeps resource usage within limits, which in turn helps keep costs under control.
So what is the requirement of a rate limiter ?
When a user sends too many requests to a website or API, they should be blocked.
It should still work reliably even when the system scales out with more nodes.
Let’s go ahead to solve first requirement. It actually boils down to solve two subproblems:
How to identify who is making the request – if we don’t distinguish between different users, we can’t limit them.
The algorithm to enforce limits – there are several, each with pros and cons.

Identifying who’s accessing
For many systems, users must log in or use an API key. In that case, it’s simple: just use userId or apiKey.
But what about public websites? Take Amazon as an example. Without a way to identify anonymous users, scrapers could easily crawl all of its data.
A common idea is to use the client’s IP Address as identity. Since IP addresses are globally unique, it sounds like a reasonable solution.
However, modern networking complicates this. Most users connect to the internet through their ISP’s router, passing through many devices before reaching the backbone of the internet.

This means that before a user’s packet even reaches the internet, it has already passed through NAT (Network Address Translation). At that point, the packet’s IP address is no longer the user’s actual address, but rather the ISP’s router address. With the explosion of connected devices and the limited supply of IPv4 addresses, many ISPs solve this by letting multiple users share a single public IP address.
On top of that, when users share the same network in places like offices, hospitals, or public spaces, the chance of IP address collisions is also very high.
So if we rely solely on this approach, many legitimate users could end up being blocked incorrectly.
Using IP Address together with other information
In addition to the IP Address, we can collect more details from the client — for example, from the browser:
User-agent: operating system, browser, browser version, OS version
WebRTC data
Language settings, installed fonts
Screen resolution
And countless other signals.
This approach is known as Browser Fingerprinting. But keep in mind, all of these parameters can be faked by savvy users 😉.
Next, let’s take a look at some common algorithms for rate limiting.
Algorithms for limiting requests
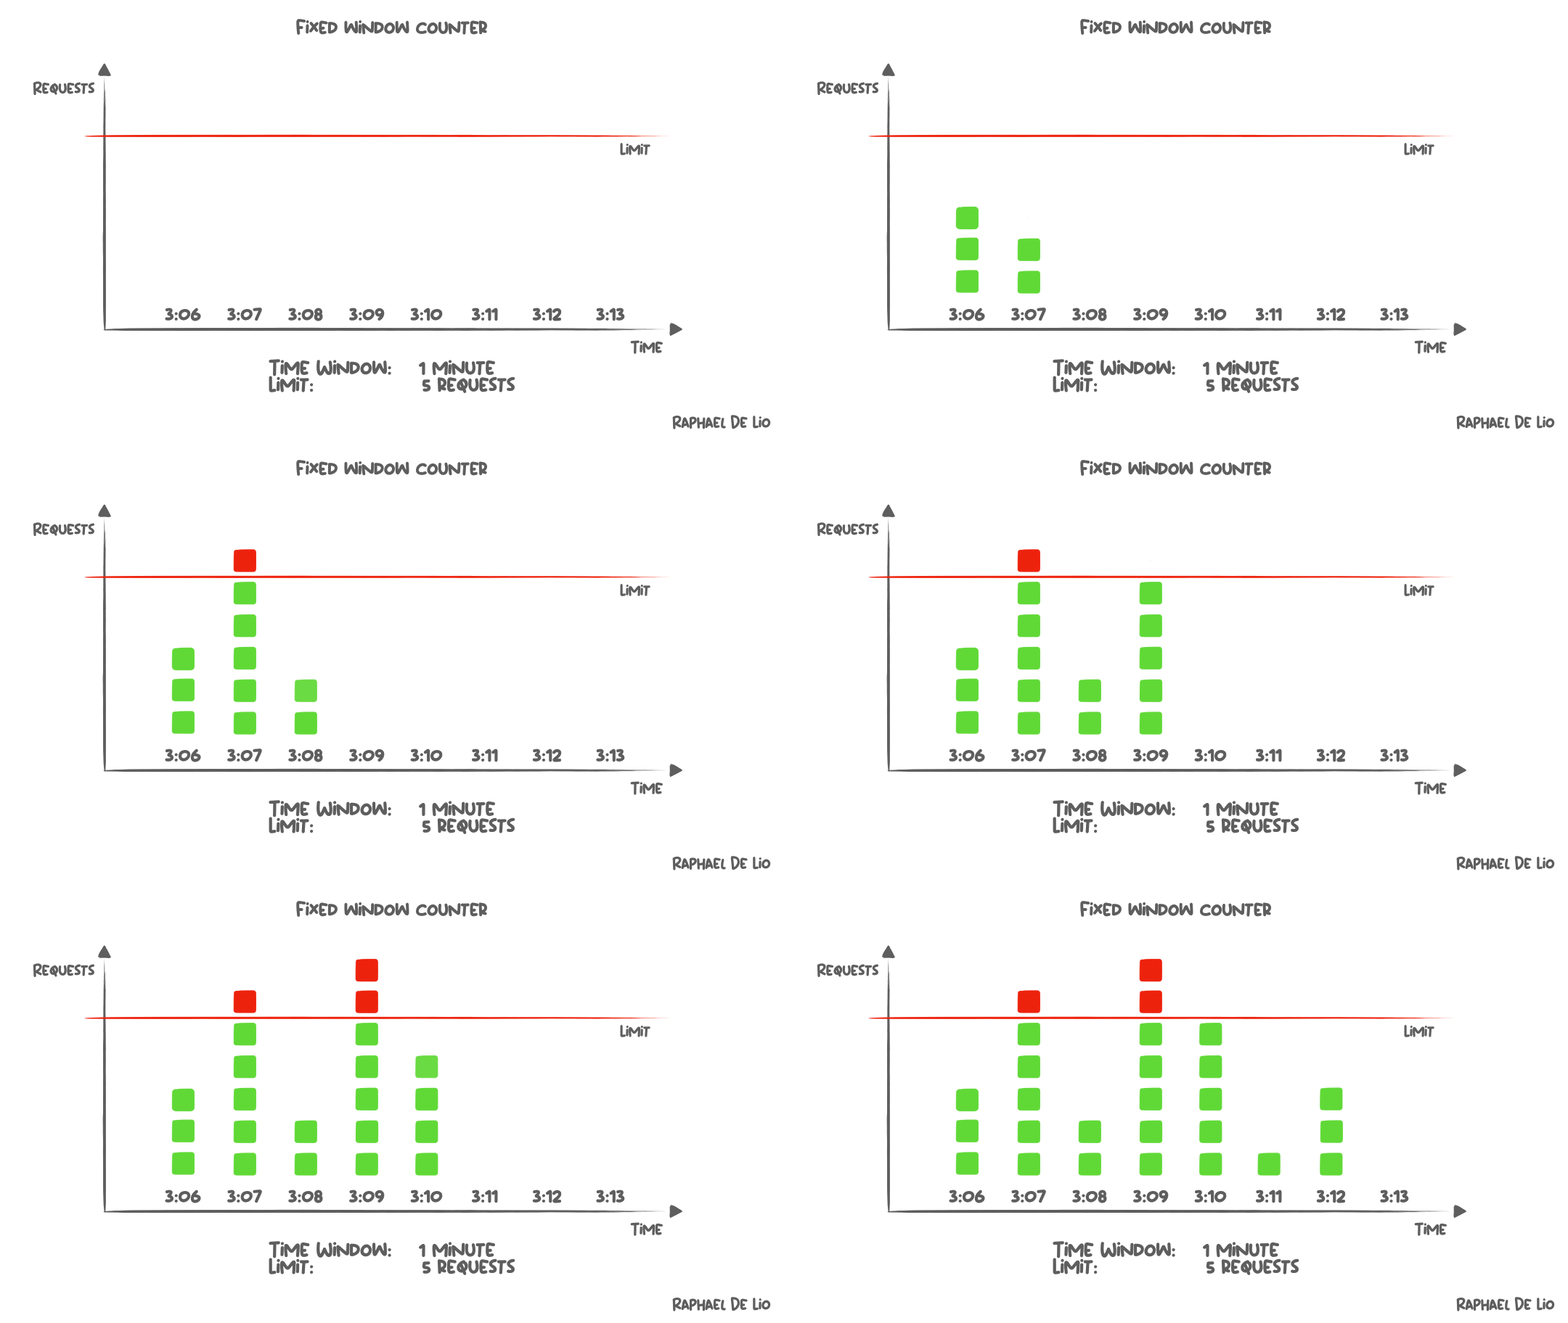
Fixed window

The core idea of this algorithm:
Divide time into small fixed intervals.
Within each interval, only allow a certain number of requests from a user.
Any extra requests are dropped.
This algorithm is quite simple to understand and easy to implement.
However, it can lead to situations where, within a certain time span, more requests get processed than the intended limit.

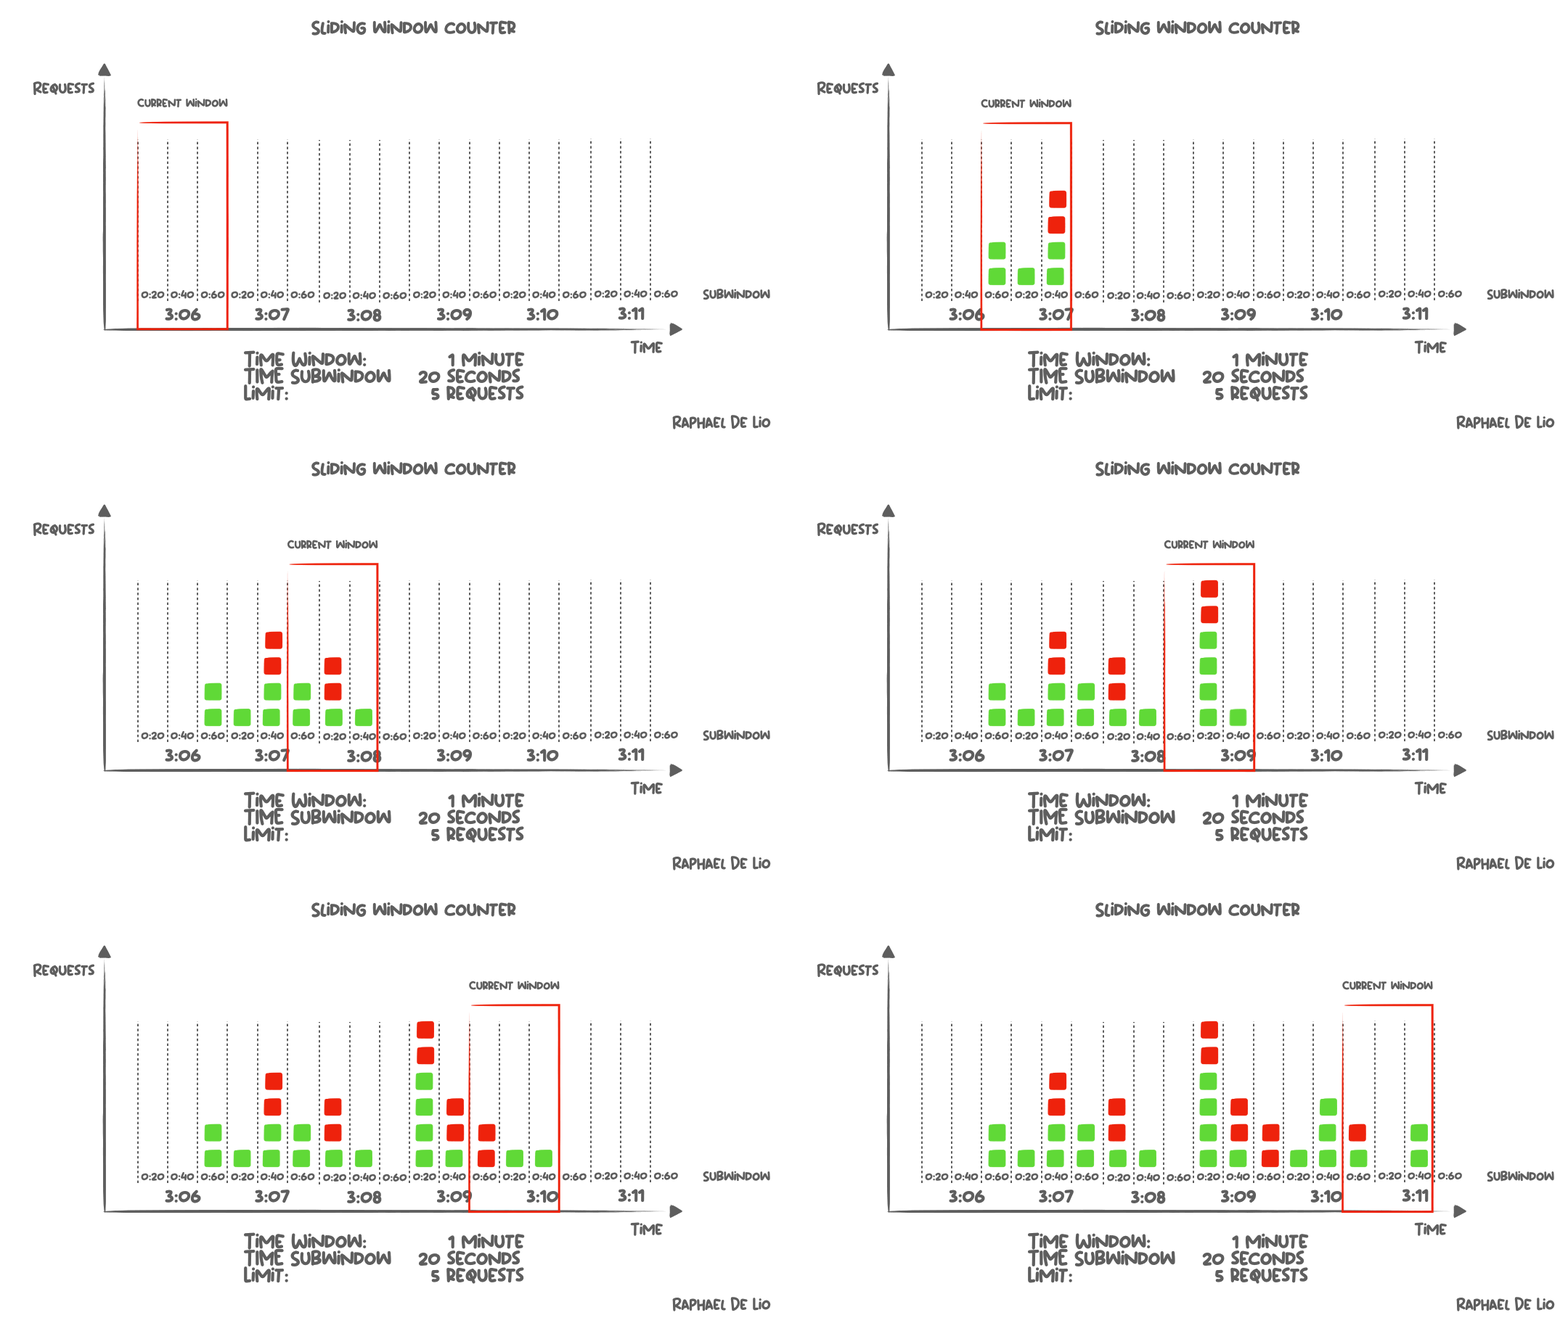
Sliding window

This algorithm addresses the weakness of the Fixed Window approach by ensuring that within any given time span, only a certain number of requests from a user can be processed.
How it works:
The algorithm tracks the
timestampsof incomingrequests.When a new request arrives, the system removes all expired
timestamps(those older than the start of the current window).If the remaining number of requests is still within the allowed limit, the new request is accepted; otherwise, it’s rejected.
Finally, the
timestampof the new request is added to the log.
Besides Sliding Window, another very popular algorithm is Token Bucket.
Token bucket

The Token Bucket algorithm works like a “bucket” with a fixed capacity. Tokens are added to the bucket at a constant rate over time (for example, 1 token per minute). Once the bucket is full, no more tokens can be added.
For example, imagine a bucket with a capacity of 5. The refill process adds 1 token every minute. When the bucket is full, any extra tokens are discarded.
Each request consumes 1 token. So when a request comes in, the system checks if there are enough tokens in the bucket:
If there are tokens available, one is removed and the request is accepted.
If not, the request is rejected.
The biggest advantage of this algorithm is that it allows bursts of traffic in a short period of time, while still processing requests at a steady pace afterward.
Of course, there are many other algorithms out there, but these three are among the most common and cover most functional needs. Depending on your specific use case, you can choose the one that fits best.
Putting it all together
Once we’ve defined the basics, here’s the high-level design of a rate limiter:

Where should we store the counter for a rate limiter?
Since this is data that needs to be accessed very quickly (otherwise it will add latency to the API), and in most cases a small chance of data loss won’t cause major issues, using a cache is the ideal choice.
How it works:
The client sends a request to the server.
The rate limiter checks request info against Redis to see if it exceeds the limit.
If allowed → forward the request to the API logic + increment the counter / add a log in Redis.
If not → drop the request.
However, as the number of concurrent requests grows, continuously storing and updating counters can lead to race conditions. So, how do we handle that?
Fixed Window
const key = `${identifier}:${window}`;
// Atomic increment and get
const currentCount = await this.redis.incr(key);
// Set expiration only on first request of the window
if (currentCount === 1) {
    const ttl = windowSize + 1;
    await this.redis.expire(key, ttl);
}
const isAllowed = currentCount <= this.maxRequests;
The key to handling Fixed Window is using the INCR operator. This avoids race conditions, provides high speed, and consumes little memory.
Sliding Window
const windowStart = currentTime - windowSize;
const key = `${prefix}${userIdentifier}`;

const pipeline = this.redis.pipeline();
// Use Redis Sorted Set
// Remove expired entries (older than window start)
pipeline.zremrangebyscore(key, '-inf', windowStart);
// Count current requests in the window (AFTER cleanup)
pipeline.zcard(key);
// Add current request timestamp
pipeline.zadd(key, currentTime, `${currentTime}-${Math.random()}`);
// Expire after windowTime
pipeline.expire(key, windowTimeTTL);

const results = await pipeline.exec();
const currentCount = results[1][1];
const allowed = currentCount < this.maxRequests;
Sorted Set is a very suitable data type for Sliding Window:
Stores data in order, in this case by timestamp
Can remove old requests by timestamp and add new requests
When combined with pipeline, it allows handling all logic atomically, effectively avoiding race conditions.
Token bucket
Implementing this algorithm with Redis is quite an interesting and complex challenge—you can explore it further if you’d like.
So what happens when we scale out to multiple nodes?

Scaling a Rate Limiter horizontally isn’t too complicated, but there are a few things to keep in mind:
At first, we can store the rate limit data in a single Redis instance. In this case, we can freely choose any algorithm, and whichever load balancer strategy we use will still work fine.
When more Redis instances are needed, we can either use sticky sessions (so each request always hits the same server) or apply an appropriate shard key for the Redis cluster.
What if the Redis server crashes? We have two options:
Fail-Closed: block all requests and return status
503: Service Unavailable. Systems that require certainty and strong control usually prefer this approach.Fail-Open: let all requests go through. However, since the rate limiter is a critical component at the very front, relaxing it this way can cause a sudden traffic spike → potential system crash.
Summary

A rate limiter is not too difficult to understand, but it plays a very important role in large-scale systems.
I’ve included some references for you to dive deeper into this topic.
See you in the next article!
References:
Credit:
- All algorithm animations are from the Medium article by Raphael De Lio: https://medium.com/redis-with-raphael-de-lio